> ## Documentation Index
> Fetch the complete documentation index at: https://docs.aihubmax.com/llms.txt
> Use this file to discover all available pages before exploring further.
# Codex CLI
> Connect OpenAI Codex CLI to AihubMax
## Overview
[Codex CLI](https://github.com/openai/codex) is OpenAI's open-source command-line coding agent. It can read your codebase, propose changes, execute commands, and iterate based on feedback -- all from the terminal.
By pointing Codex CLI to AihubMax, you can use it with any OpenAI-compatible model available through AihubMax's API.
Codex CLI supports a `config.toml` configuration file for defining custom model providers, making it easy to connect to AihubMax without modifying environment variables for the base URL.
## Prerequisites
An active AihubMax API key with access to OpenAI-compatible models. [Go to AihubMax →](https://api.aihubmax.com/console)
Codex CLI requires Node.js version 22 or later. [Download Node.js →](https://nodejs.org/en/download/)
## Installation & Configuration
```bash theme={null}
npm install -g @openai/codex
```
Verify the installation:
```bash theme={null}
codex --version
```
Before configuring environment variables, go to the [AihubMax Console](https://api.aihubmax.com/console) to create a dedicated key:
1. Open the "API Keys" page and click "Create Key".
2. Name the key as you prefer for easy identification.
3. **Make sure to select the "Codex" group** — this is the official channel for Codex CLI, ensuring OpenAI-compatible protocol support and adequate concurrency limits.
If you don't select the "Codex" group, Codex CLI may not be able to call AihubMax's Codex-compatible models, or you may encounter rate/feature limitations.
You can choose either method below: use **CC-Switch** for one-click setup (automatically writes environment variables and Codex configuration), or **manually configure** by setting environment variables and editing `config.toml` in the next step.
Codex CLI reads the `OPENAI_API_KEY` environment variable for authentication. Set it to your AihubMax API key:
[CC-Switch](https://github.com/farion1231/cc-switch/releases) can automatically write the environment variables required by Codex CLI:
1. [Download and install](https://github.com/farion1231/cc-switch/releases) the latest CC-Switch package for your system.
2. Import your key into CC-Switch using **either method**:
* **One-click import (Recommended)**: In the AihubMax Console's key list, click the dropdown menu next to your key and select **"CC Switch"** — the configuration will be automatically imported into CC-Switch.
* **Manual setup**: Manually add a "Codex CLI" configuration in CC-Switch, set the Base URL to `https://api.aihubmax.com/v1`, and enter your API Key.
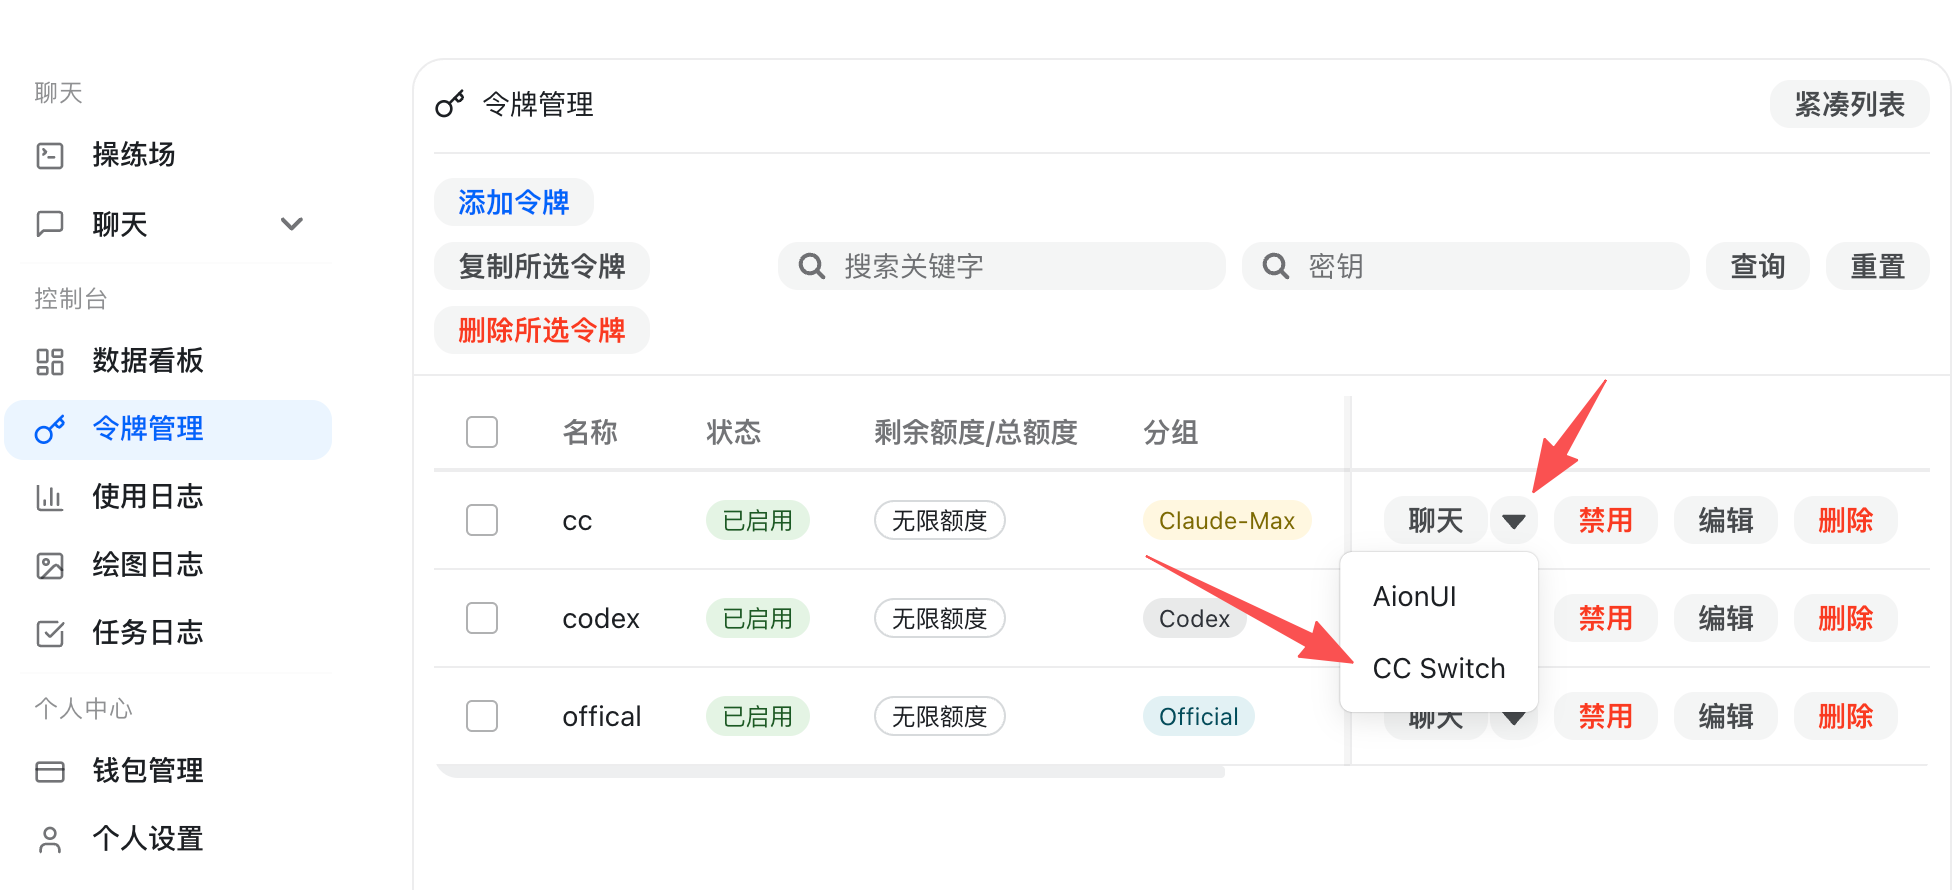
After import, CC-Switch will inject `OPENAI_API_KEY` into your current shell session — no need to manually edit configuration files.
Add the following line to your shell profile (`~/.bashrc`, `~/.zshrc`, etc.):
```bash theme={null}
export OPENAI_API_KEY="sk-your-foxapi-api-key"
```
Then reload your shell configuration:
```bash theme={null}
source ~/.zshrc # or source ~/.bashrc
```
Set the environment variable permanently for the current user:
```powershell theme={null}
[Environment]::SetEnvironmentVariable("OPENAI_API_KEY", "sk-your-foxapi-api-key", "User")
```
Restart your terminal for the change to take effect.
If you chose CC-Switch in the previous step, the tool has already written your `~/.codex/config.toml`. You can skip directly to "Start Using Codex". This step is only needed for manual configuration.
Create or edit the Codex CLI configuration file:
Edit `~/.codex/config.toml`:
```toml theme={null}
model = "gpt-4.1"
model_reasoning_effort = "medium"
model_provider = "foxapi"
[model_providers.foxapi]
name = "AihubMax"
base_url = "https://api.aihubmax.com/v1"
env_key = "OPENAI_API_KEY"
wire_api = "responses"
```
Edit `C:\Users\{username}\.codex\config.toml`:
```toml theme={null}
model = "gpt-4.1"
model_reasoning_effort = "medium"
model_provider = "foxapi"
[model_providers.foxapi]
name = "AihubMax"
base_url = "https://api.aihubmax.com/v1"
env_key = "OPENAI_API_KEY"
wire_api = "responses"
```
The `wire_api` field must be set to `"responses"`. The `"chat"` option is deprecated and may cause unexpected behavior.
**Configuration fields explained:**
| Field | Description |
| ------------------------ | ---------------------------------------------------------------------------- |
| `model` | Default model to use (can be overridden with `--model` flag) |
| `model_reasoning_effort` | Reasoning effort level: `"low"`, `"medium"`, or `"high"` |
| `model_provider` | Name of the custom provider (must match the `[model_providers.xxx]` section) |
| `base_url` | AihubMax's API endpoint |
| `env_key` | Environment variable name that holds your API key |
| `wire_api` | API protocol to use (`"responses"` is required) |
Navigate to your project and launch Codex:
```bash theme={null}
cd /path/to/your/project
codex
```
Or run a one-off command:
```bash theme={null}
codex "Add input validation to the signup form"
```
## Verify the Connection
Test the connection with a simple prompt:
```bash theme={null}
codex "Say hello and confirm you are working"
```
If the configuration is correct, Codex will respond through AihubMax's API.
## Recommended Models
| Model | Best For |
| --------- | ----------------------------------------------------- |
| `gpt-4.1` | Complex multi-step coding tasks (recommended default) |
| `gpt-4o` | General coding tasks with balanced speed and quality |
| `o4-mini` | Fast, cost-effective coding assistance |
You can override the default model from `config.toml` when launching Codex:
```bash theme={null}
codex --model gpt-4o "Refactor the auth module"
```
## Troubleshooting
* Verify your `OPENAI_API_KEY` is a valid AihubMax key.
* Ensure the key has not expired and has sufficient balance.
* If using `config.toml`, confirm the `env_key` field matches the environment variable name you set (default: `OPENAI_API_KEY`).
* Check that `base_url` in `config.toml` is set to `https://api.aihubmax.com/v1` (with `/v1`).
* Verify your network can reach `api.aihubmax.com`.
* Confirm the model name is correct and available on AihubMax.
* Check your AihubMax account for model access permissions.
* Confirm the file is located at `~/.codex/config.toml` (macOS/Linux) or `C:\Users\{username}\.codex\config.toml` (Windows).
* Validate the TOML syntax -- ensure strings are properly quoted and section headers use square brackets.
* Check that `model_provider` value matches the `[model_providers.xxx]` section name exactly.