Overview
Codex CLI is OpenAI’s open-source command-line coding agent. It can read your codebase, propose changes, execute commands, and iterate based on feedback — all from the terminal. By pointing Codex CLI to AihubMax, you can use it with any OpenAI-compatible model available through AihubMax’s API.Codex CLI supports a
config.toml configuration file for defining custom model providers, making it easy to connect to AihubMax without modifying environment variables for the base URL.Prerequisites
AihubMax API Key
An active AihubMax API key with access to OpenAI-compatible models. Go to AihubMax →
Node.js 22+
Codex CLI requires Node.js version 22 or later. Download Node.js →
Installation & Configuration
1
Install Codex CLI
2
Set Your API Key
Before configuring environment variables, go to the AihubMax Console to create a dedicated key:
- Open the “API Keys” page and click “Create Key”.
- Name the key as you prefer for easy identification.
- Make sure to select the “Codex” group — this is the official channel for Codex CLI, ensuring OpenAI-compatible protocol support and adequate concurrency limits.
config.toml in the next step.Codex CLI reads the OPENAI_API_KEY environment variable for authentication. Set it to your AihubMax API key:- CC-Switch (Recommended)
- macOS / Linux
- Windows (PowerShell)
CC-Switch can automatically write the environment variables required by Codex CLI: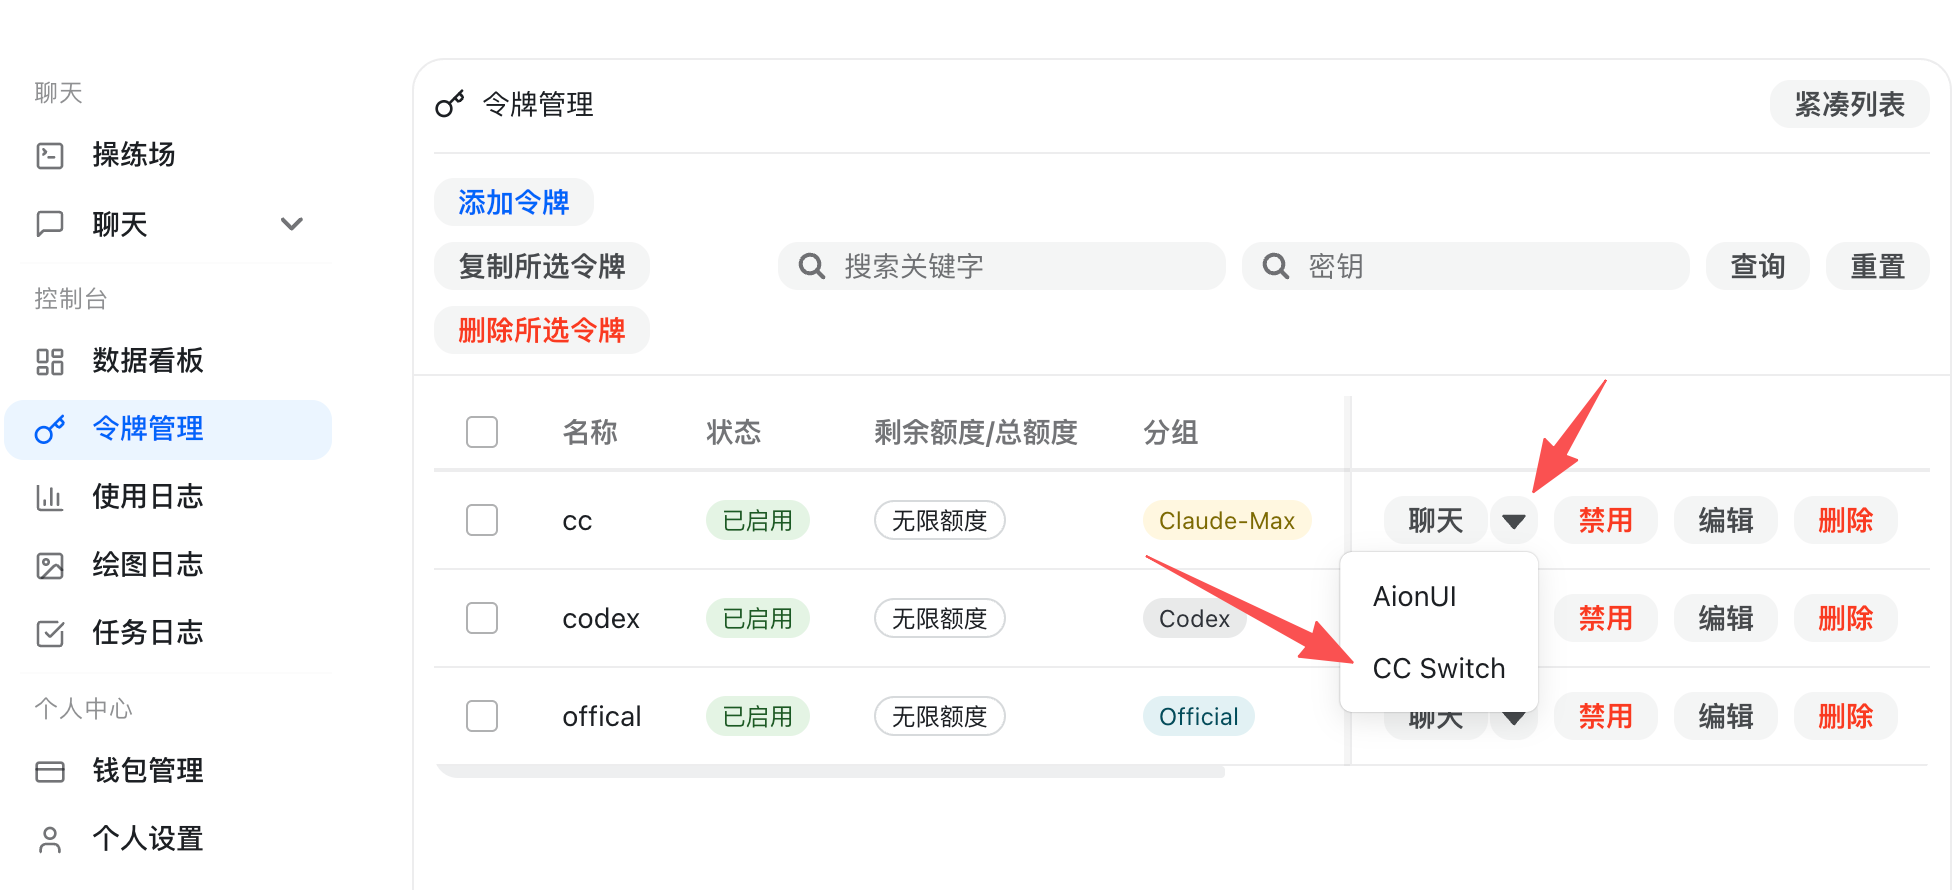 After import, CC-Switch will inject
- Download and install the latest CC-Switch package for your system.
- Import your key into CC-Switch using either method:
- One-click import (Recommended): In the AihubMax Console’s key list, click the dropdown menu next to your key and select “CC Switch” — the configuration will be automatically imported into CC-Switch.
- Manual setup: Manually add a “Codex CLI” configuration in CC-Switch, set the Base URL to
https://api.aihubmax.com/v1, and enter your API Key.
After import, CC-Switch will inject OPENAI_API_KEY into your current shell session — no need to manually edit configuration files.3
Configure AihubMax as a Model Provider
Create or edit the Codex CLI configuration file:Configuration fields explained:
- macOS / Linux
- Windows
Edit
~/.codex/config.toml:4
Start Using Codex
Navigate to your project and launch Codex:Or run a one-off command:
Verify the Connection
Test the connection with a simple prompt:Recommended Models
You can override the default model from
config.toml when launching Codex:
Troubleshooting
Error: Connection failed
Error: Connection failed
- Check that
base_urlinconfig.tomlis set tohttps://api.aihubmax.com/v1(with/v1). - Verify your network can reach
api.aihubmax.com.
Model not found
Model not found
- Confirm the model name is correct and available on AihubMax.
- Check your AihubMax account for model access permissions.
Config file not taking effect
Config file not taking effect
- Confirm the file is located at
~/.codex/config.toml(macOS/Linux) orC:\Users\{username}\.codex\config.toml(Windows). - Validate the TOML syntax — ensure strings are properly quoted and section headers use square brackets.
- Check that
model_providervalue matches the[model_providers.xxx]section name exactly.